Art with Ms. Djordjevic
  • Home
  • Contact
  • Classes
    • Photo I
    • Photo II
    • Photo III :: Semester I
    • Photo III :: Semester II
    • Photo IV :: Advanced Photo
  • Resources
  • Home
  • Contact
  • Classes
    • Photo I
    • Photo II
    • Photo III :: Semester I
    • Photo III :: Semester II
    • Photo IV :: Advanced Photo
  • Resources

Photo II

This class is an intermediate study of photography that focuses on developing skills learned in Photo I and bringing new skills to the forefront. We will explore more serious forms of photography and expect a more professional outcome.
Photo i Course expectations

Floating Food

2/25/2021

 
Picture
Ever wonder how these photos were taken? For this project we are going to explore the idea of floating food. This can be done with a whole meal, or something more simple, but there needs to be a lot of planning and some setup.  You can do this with a single item, but using something that has several layers (sandwich, or hamburger, or a stack of pancakes) adds to the interest of the final image. Do you want this to be funny? How about holding your hand below to levitate the food. Or what about throwing something at the camera (please fake throw) to make it fun?
Assignment:

Create 2 floating food images. Remember items with more physical layers is more interesting, but having those layers be easily attached helps to make them interesting (i.e. it is very hard to float a layered trifle or an ice cream cone). You will need to take several images of each food to give yourself options, but the setup is most important. Think about a clean background to make it easier to use the content-aware fill option, also think about your lighting. Creating a mini studio is helpful in making this very clean in post production. 

Steps:
  • Start by checking out this website on one way to photograph your floating food
  • Also check out this video on throwing a donut (this one was done with clear fishing wire)
  • Think of ideas—what kind of food do you want to float? Think back to your food photography project
  • You are creating 2 floating food images, you want to take several images for options but they may be of the same setup. Remember to change your lighting.
  • Post-production is where these are going to come together by erasing objects that hold the food up, so be sure to have a clean background that is easy to use for content-aware fill. 

Objective: To create interest in your image by implementing photoshop editing techniques to make pieces of your photo disappear

The Composited Image

2/11/2021

 
Picture
© Al Wildey
In this project you are going to explore the composited image. This composite will be a series of photos taken in one place overlapped to help reinforce the ideas of memory and evoke a feeling from your viewer. Take us on a journey—of a space, or a memory, a conversation, or a roadtrip—and take several images in a short span of time. By overlapping these photos in post-production we are literally creating an image that focuses on the idea of time, capturing an emotion or a representation of a moment in time. Using color and movement to inform the image and explore the idea of the passing of time.  Will your image be happy or melancholic? Is it a representation of your favorite childhood memory, or a conversation with your best friend? What about a walk through the woods? How can you use this technique to give us a story in one single image? 
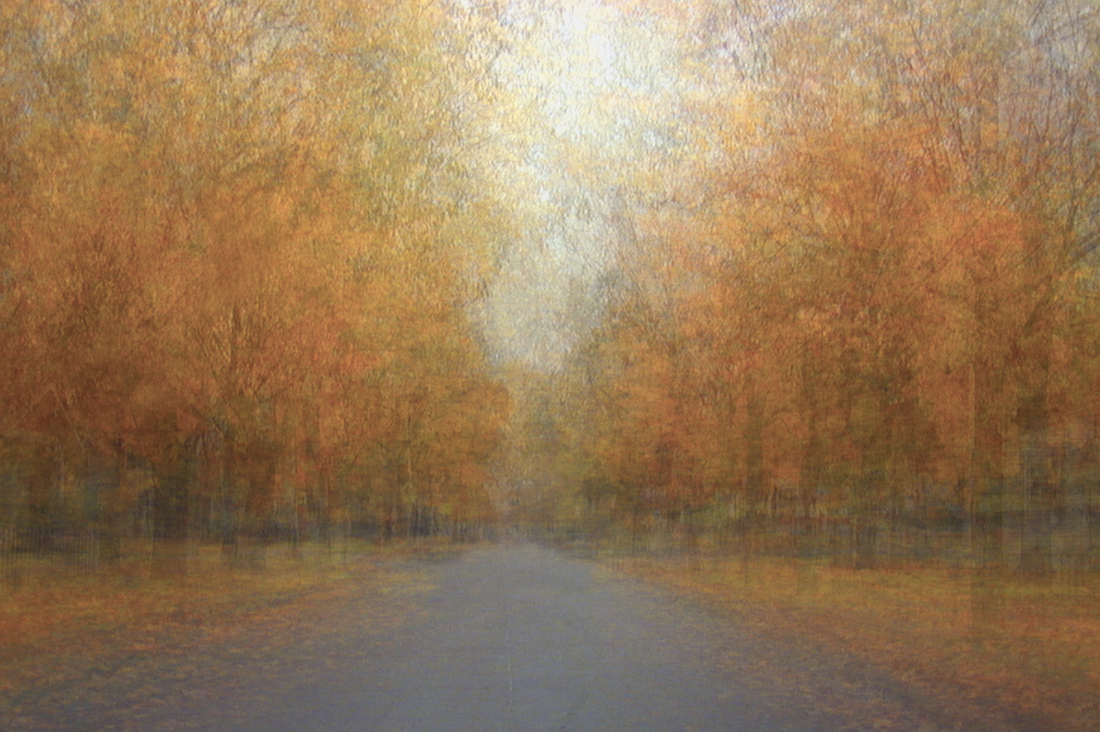
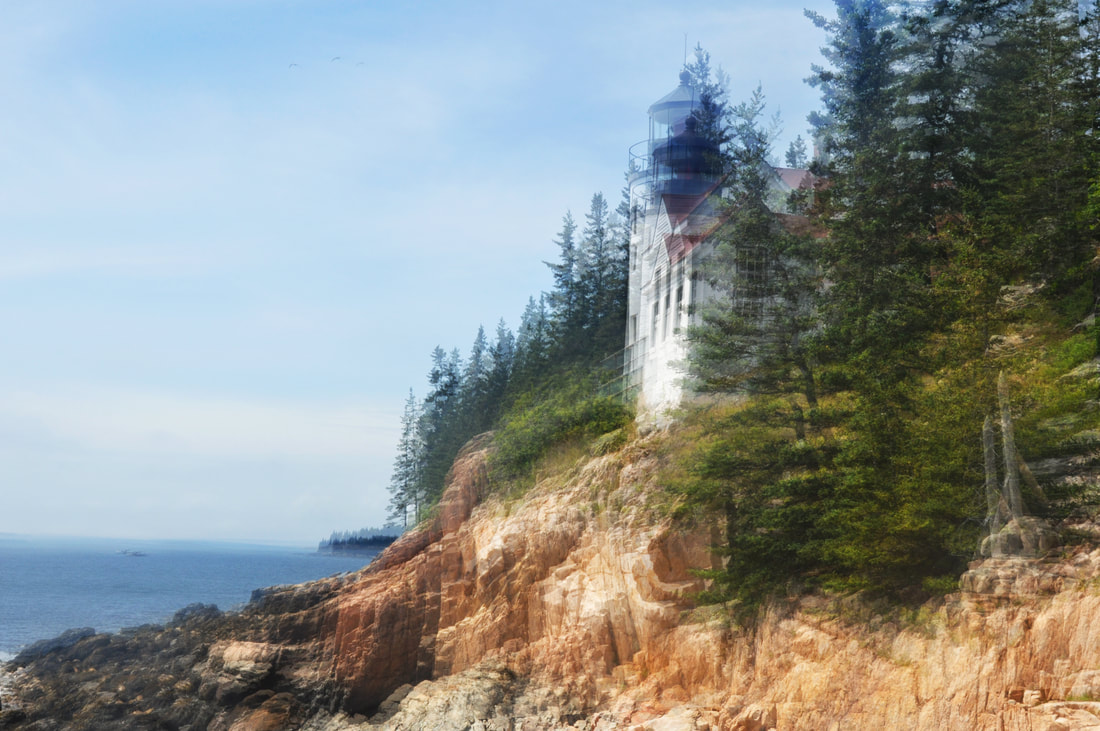
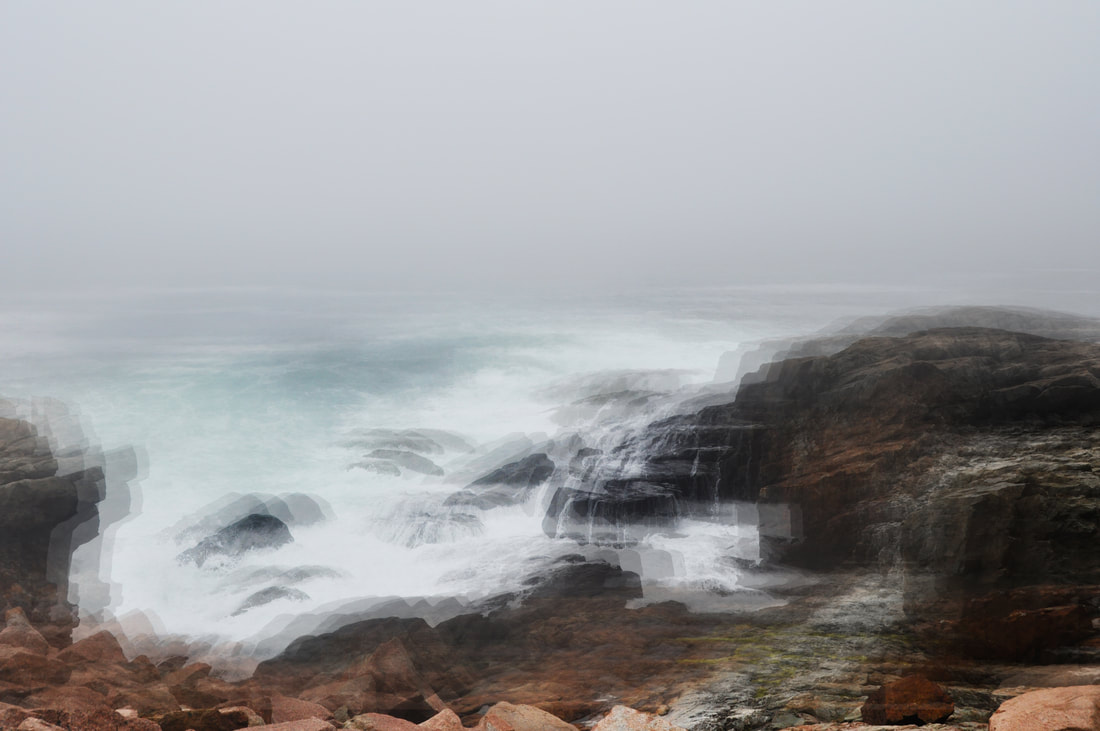
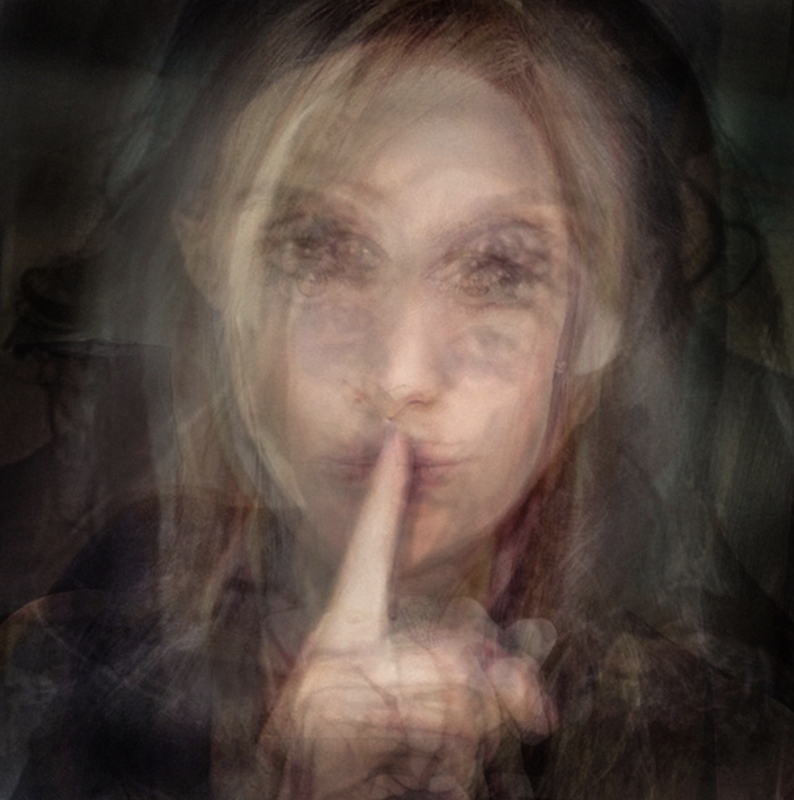
Assignment:

Create 3 composite journey images. You can use object, take a walk outside, photograph several portraits in a row, or explore even more conceptual ideas about the passing of time. Remember to take several images that overlap with one another, try 10 images or 50 images...how might more images be interesting? 

Steps:
  • Start by checking out Al Wildey's work
  • Think of ideas—how can you best represent a journey or the passing of time?
  • You are creating 3 images, this will be 3 separate shoots to create the overlapped imagery 
  • Post-production is where these will really come together, try to think about a lot of change in your images and also about small movements if you want the image to hold together more clearly

Objective: To use separate images (taken over a short period of time) to create the feeling of time and memory. 

Frozen Flowers

2/4/2021

 
Picture

This project is an exploration in creating a design with frozen items (flowers work particularly well). Think of this like stained glass, don't be afraid to add color to your water, or include non organic items (toys, pieces of sea glass, money, etc.). Most important is making sure you give yourself time to freeze the items, then backlight them in a window or other bright light source. You can crop close to your flowers to make a more interesting layout, we should not see the edges of your ice block. 
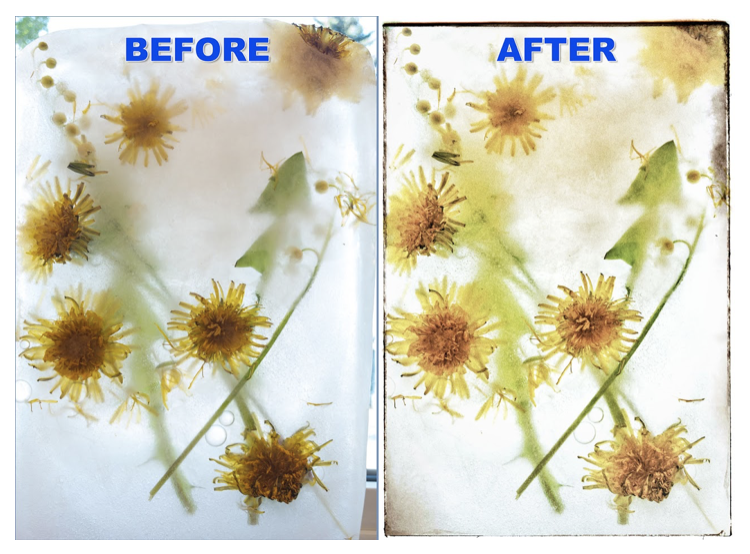
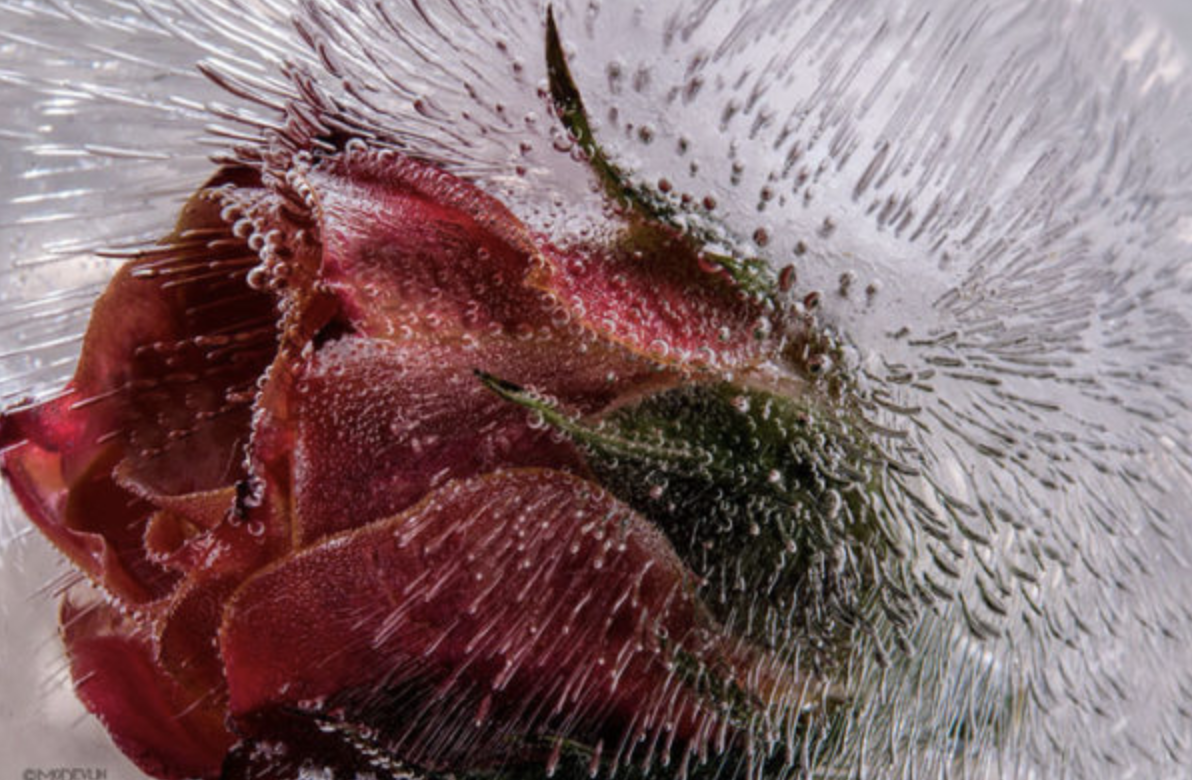
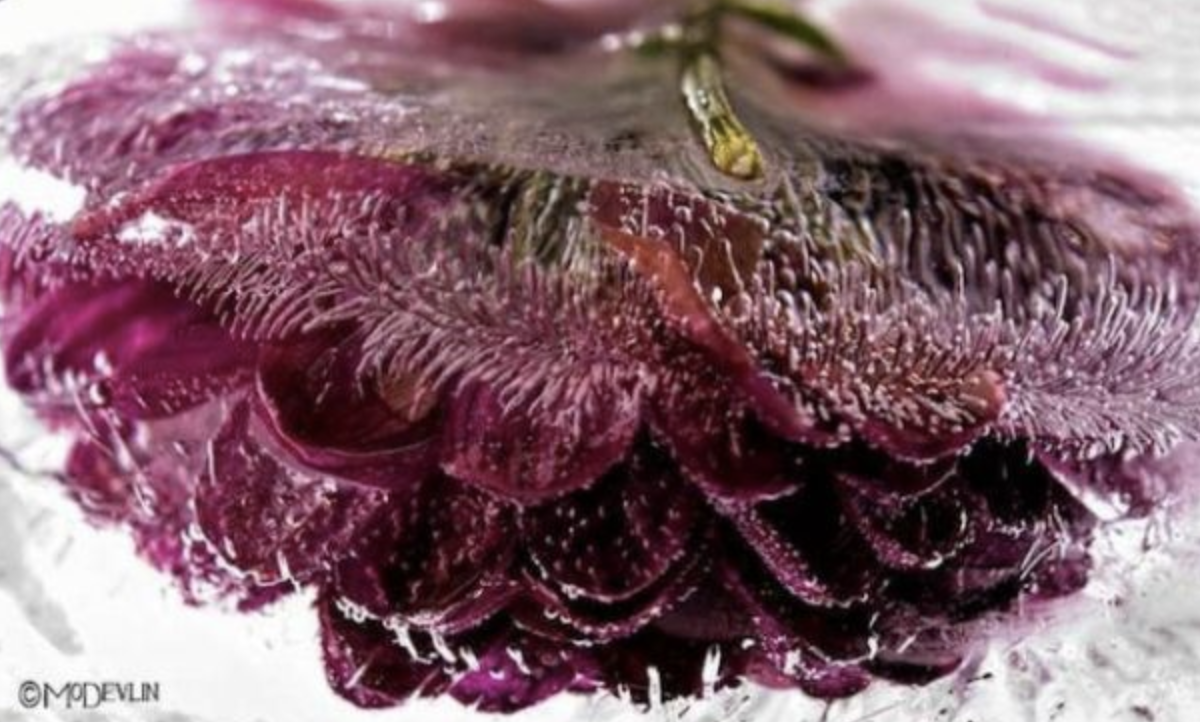
Assignment:

Create 3 frozen flower photos using both flowers and other items to create an interesting, and dynamic composition. Negative space is your friend here, you do not need to overload the ice block with items. 

Steps:
  • Start by checking out this article and interview
  • Collect flowers and other items and lay them in a shallow large pan (an 8x8, or 9x13 work well) with only an inch or two of water (the deeper the water the less you'll be able to see through it, consider that when choosing items)
  • You are creating 3 images, you should probably create 3 different frozen designs
  • Freeze your designs overnight. In the daylight, take them out and place them in a window so you get the backlight coming through (might be particularly interesting with sunlight coming directly through but any bright space will work)

Resources:
- frozen flower tutorial

Objective: To use design elements to create a dynamic composition using items frozen in water and natural backlighting

    Author

    Write something about yourself. No need to be fancy, just an overview.

    Archives

    June 2022
    April 2021
    March 2021
    February 2021
    December 2020

    Categories

    All

    RSS Feed

Proudly powered by Weebly