Creative Photography
This class is an advanced study of photography that focuses on photography as an art form. We will explore more "alternative" methods of darkroom and digital photography to examine the true art of the photographic medium
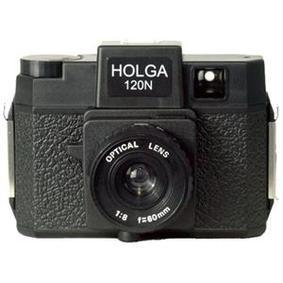
 The Holga camera is an all-plastic child's toy camera that creates beautiful, ethereal photographs. Holga picked up a cult following among photographers and photo enthusiasts following it's introduction in the 1980's. It's known for it's lack of precision, light leaks, happy accidents, and the fact that each Holga is slightly different than the next. The plastic camera allows the photographer to focus on the feeling of the image and the scene in front of them and not rely on the perfection that is so often afforded the common photographer and her camera. Holga is often known as the Diana camera's little brother--Diana was an all-plastic camera famed in the 1960's for it's low-fi, ethereal quality images. Both cameras are celebrated for creating art images with a toy camera.
Assignment:
You must photograph an entire roll (12 square frames) using the Holga camera. You are not limited on shooting one subject but definitely photograph outside as there is not enough light for indoor photography. Holga can take beautiful portraits so don't shy away from portraiture with this wonderful plastic camera. The idea behind this assignment with the plastic camera is to take away your ability to control everything and force you to have more fun with your photography. Allow the accidents (happy accidents) and see what you can create. Christopher James talks all about the idea of play in photography in this article about plastic cameras. Steps: • TAPE YOUR HOLGA, it will leak light and you will be sad. :( • Holga only has 3 focal lengths (one person, three people, and a mountain range) to choose from but they can help to get a clearer image depending on what you are photographing. • Holga also has two aperture settings, sunny and cloudy being approximately f/11 and f/8, but only one shutter speed of 1/125 second so you want bright overcast or open shade shooting conditions if possible...and I'm not entirely convinced that the switch actually does anything at all. • You also have the option of putting your Holga on a tripod and shooting with the B (bulb) setting for beautiful night photography (especially fun in the rain) but make sure it is set to N (normal) for all other shooting conditions.
Assignment:
For this assignment you will pull old negatives and using scissors, scratch tools, and permanent markers you can start changing the negative. You can tape the pieces of the negative together to form another negative. Think about weaving the negative strips or using a paper hole punch. There are so many options! You will be creating 2 different altered images to pass in and these can be done in different ways. Steps: • Start by finding old negatives or prints to work from (you will be ruining the negative so make sure it is not one you really like) • Find ideas on what you might want to do—do you want this to be conceptual or just focus on design? • Start cutting, scratching, or adding to the surface of the negative (or print) to see what happens
Some Artists to consider: Henri-Cartier Bresson, Steiglitz, Steichen, Emmet Gowin, Edward Weston, Bill Brandt, Winogrand, Weegee, Diane Arbus, Robert Capa, Walker Evans, Tina Barney, Atget, Brassai, Joel Meyerowitz, Annie Lebowitz, Imogen Cunningham, Minor White, etc.
Assignment: You must photograph an entire roll of images (or 50 frames if you are shooting digital) with a sense of your chosen photographer’s style. Definitely think about their message and the overall look of their work. Be creative and make these images your own—do not simply copy one of their images. These images should be your ideas that emulate your photographer and incorporate your own unique talents. You can use their ideas either stylistically or symbolically. Steps: • Research a photographer. Try this google search to give you a jumping off point. • Write a one-page paper that describes their style, how you want to incorporate their style into your photographs, what you like about their work, and give me a background on them. • Photograph your images using their ideas of style, intent, subject, and possible equipment. • Make sure to make this your own by only using their ideas of style and not their actual images, unless you want to focus on appropriation. This work should be you with a little twist. I should be able to see the influences of your personal work and the inspiration from your chosen photographer.
Assignment:
You must photograph 3 different images showcasing the two sides of your personality. The set ups should be different from one another. Remember to consider your background, you can use the studio or try a clean background of your home. Something that is busy will be tough to edit. Definitely think about your message and what you are trying to convey. These can be fun and over the top, or serious and emotional. Steps: • Look through your Instagram or other social media platform). Do you notice a trend? • How is the real you different from the one you show online? • Think about ways to convey the differences, is it emotional or superficial? • Photograph yourself without moving the camera—take one shot with one version of yourself, then without moving the camera, take another photo of yourself on the other side or in front of your original photo Night photography is important and necessary for every photographer to explore. Using digital cameras we will explore the night landscape and the capture things that are never seen with the naked eye—like colored of reflected light in the sky, movement, and light trails. Night photography is beautiful and fun and can really change the way you view the world at night, but it does require a little patience and a lot of trial and error. Assignment:
Shoot 50 frames of night photography focusing on three different aspect of night photography: Long Exposure, Night Portraits, and Painting with Light (approximately 15-20 of each). Some of your photographs will incorporate 2 or more elements, like a night portrait could also be a long exposure. Here are some approximate camera settings to keep in mind: Long Exposure: Use an ISO of 200 or 400 and bring your f/stop higher (f/8-f/16) and start with a long shutter speed (10-30 seconds). Painting with light: Very similar settings to long exposure but may need the longer exposure times (try BULB setting) to capture words or shapes that are being created. You can use a lower f/stop for this one. Night portrait: Just like with a day portrait you will need a low f/stop (as low as the camera can go) and make sure you are shooting at 1/60th or higher for your shutter speed if you are hand holding the camera. I would try to keep the ISO as low as possible (400-800) but you can go higher if you just don't have enough light. You can also try a longer exposure night portrait but make sure both you and your subject are very still. Steps: • Shoot in RAW format because it will offer more flexibility for improper exposures • Change your setting according to what you are photographing and work from there because the settings will be different depending on how much light is available where you are photographing. • Tripod: You need to keep your camera as steady as possible, so unless you can find a ledge, wall, post, or car hood that you can set your camera on you’ll need a tripod. • Self Timer: your camera has a self-timer mode, which will give your camera enough time to settle after you press the button to hopefully not cause any movement in your shot. If you can't find the mode on your camera then google it! • Focusing: Most cameras will have some difficulty focusing using auto-focus because there is simply not enough light. Switch your camera to manual mode (usually on the lens) if your camera is having trouble. I love cyanotypes! I actually love all types of alternative process photography. So much of photography is about perfection, and after years of making (or trying to make) perfect prints I really fell in love with the idea of chance in my photography. The chance for something to come out a little different than I anticipated, the chance to let a little of the magic of photography come out in my print. After years of making these prints on my own I decided to share a little of this magic with my classes and have been doing so for the last 8 years! Cyanotype is one of the first forms of photography and was actually created to make blueprints—architectural drawings of buildings. The process creates a cyan-blue image that is beautiful and different. The process uses a wet photo emulsion that is painted onto paper and then dried and exposed outside using UV light. The brush strokes become an important and stylistic part of the image. Creative photography will be working on these prints all week in the beautiful fall sunlight.
Assignment:
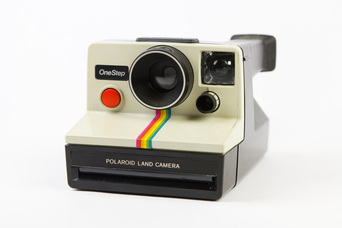
Find 2 family photos (they do not have to have people in them) and photograph them in the style of Dear Photograph and write your own story about them. These do not need to be taken with a high quality camera, but they must be clear and be able to be printed 5x7. You will pass in 2 images to Google Classroom and print your best one as a small 5x7. *All photos below are taken from dearphotograph.com  Polaroid was the premier producer of instant film for professional photographers from the mid 1900's. They made pull apart film and the famous Polaroid land cameras. In 2008 the company decided to stop producing instant film in favor of digital endeavors and it was a very sad day for photographers and artists everywhere. Polaroids were used by professional photographers to check and test their lighting long before digital existed. Artists figured out that you could separate this pull apart film and transfer once side while being able to "lift" the image surface off of it's backing and by ruffling and folding it make a more interesting image with the other side. When Polaroid stopped instant film production a few other companies stepped forward so photographers could continue to create and explore with instant film, and we are using Fugi instant film. Assignment:
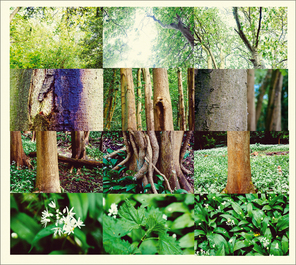
You must photograph 6 frames of slide film (very expensive and very unforgiving so make sure your images are metered and focused) of anything you want. Remember that you are making these into Polaroid lifts and so imagery with lots of color and texture work very well. You are not limited on shooting one subject but definitely photograph outside as slide film has a color temperature set for outdoors. The images end up dreamy and fun so keep this in mind while shooting. You will then be producing one final Polaroid lift on the surface of your choice. Steps: • Take 6 frames of slide film outside and in brighter daylight and share the camera with your classmates • Texture and color work very well • We will be using the daylab to make Polaroid images Resources: http://petapixel.com/2013/07/15/how-to-make-polaroid-emulsion-lifts/  For this project all you need is a camera and 20-30 minutes to take a walk! You will be photographing everything you see on your walk in a somewhat abstract manner with the intention of later incorporating it into a grid in Photoshop. Think about textures and color and abstraction—think about feeling and the way you can convey what you experience on your walk rather than what you see with your eyes. Assignment:
Photograph 50 frames (at least) on your 20-minute photo walk. Consider the colors, textures, and interesting details around you. Remember not to focus on getting one great image, but amass a collection of images that will work well together—maybe the connection between these images is color, or texture, or distance from the subject. You will be passing in one final deconstructed landscape. Steps: • Just take a walk. Don't think too much about your location to start, just bring your camera along with you • Think about breaking your location down into sections (sky/trees, middle ground/tree bark, ground or what's at your feet) and photograph the interesting pieces of those sections • Look closely at your surroundings and photograph each image in a intentional way by removing unnecessary objects and extraneous information |
Student GalleryArchives
September 2023
Categories |